Showing posts with label making. Show all posts

9.8.11

Block

I mentioned before my trip to the library to get some sewing/ dress making/ pattern making books. So I thought I would read up and try and work on improving some of the sewing I do and how I do it and hopefully learn a few things.

I decided I was gunna make a pattern block. I have been basing my patterns so far on a basic dress pattern and adjusting it, but haven't made a block that is just right. So I thought I would do it properly and follow the instructions.

I used a standard pattern sized up to make one set of blocks, I then followed this method of measuring the body and drawing it all out. I then adjusted this one on both my model and by trying it on myself.


This is my block so far on my model. It still needs a fair bit of work, cutting etc and then drawing out onto paper.

making a block
I have been doing a lot of pinning and adjusting to try and get it just right.

I think I might test this out, once it's finished, by making a black dress for work, so watch this space.

block, body, pattern, making, sewing, books, dress making, pins,

14.4.11

How I make a necklace

 necklace, chain, cord, wire, plyers, making, pendant, thread, silver
This post is about how I make my necklaces.

I love to make everything from scratch as much as possible and this shows just how it's done.

I start out with silver thread and wire and end up with a necklace with a clasp.

Click on image to enlarge and see the details.

4.8.10

Making a Ring

I decided recently that I would make a ring. I have made one ring before, but it was a flower one very different to my new idea.
I decided to design a ring that I would cut out with a piercing saw. I played with lots of ideas and designs before settling on one.
note book - handmade, saw pierced, surf jewels, jewellery, ring, aluminium, flowers, leaves, hearts, design, making, designing
I did a test run also, which took me a lot of time and had a few problems- mainly some weak points that needed to be stronger (which I took into consideration the next time round).

Here is my final design that I drew out into my notebook.

jewellery ring design
I then drew this on to the aluminium sheet and began cutting it out with a piercing saw.
ring designThis image shows my piece held in a clamp which I use to hold it while cutting.
This is my ring once all cut out and roughly filed.
flower leaf heart ringI need to just do some finishing touches to this ring and then I will upload a pic soon. It currently needs a little more filing and finishing.

27.2.10

New experiments with Wire

I am always experimenting with ideas and always wanting to come up with new ideas. I recently have been trying out ideas in wire.

hammered wire charm pendant by surf jewels handmade jewellery

First I shape the wire the way I want it, then I hammer it so that it reflects light and has a good texture. I then cut out my charms (in this case a flower and leaf) which I draw out, cut with a piercing saw, then file and sand to finish. To make the flower I also added fine beading wire and a couple of seed beads to finish.

handmade jewellery by surf jewels

the process of making by surf jewels handmade jewellery
I am definatly going to experiment more with wire and the charms I make by hand once I've got some more designs worked out.


handmade jewellery
For more jewellery, info and image of my work visit my site:
or contact me and I can make a customised item:

4.1.10

New Year!

New year so a new post.

I have got lots of new projects in the pipeline and I will be updating as and when I get them finished. I have just started on a new grey knit top, I have a dress to finish making (need to put a zip in and adjust), just bought some fabric to make a bear (not something Ive tried before) and of course lots of new jewellery ideas and designs to try out.

Watch this space...

25.8.09

More beads

Just back from hols and spent the morning (and yesterday and last night) making loads of beads. Pics will come soon. They are all drying out now, so on to making new cords for all the beads to go on. Busy busy.

Also in the process of updating my pics and website, so check it out soon... http://surfjewels.000space.com

9.6.09

Beads beads beads

The beads I made.

I made these beads by hand and then some were painted and some glazed. I then use these in my new pieces.

25.4.09

How I make Jewellery

I always love to know how artists design and make their items and where their ideas and inpirations come from and also love to know how they make them.


So I thought I'd do a blog about how I create my jewellery...


I am inspired by the sea, nature and the world around me and any thing beautiful that I come across. I am also inspired by other artists and the materials I work in. I love to try out new materials and experiment.

surf pendant handmade jewellery
I have my favourite materials, I love to work in metals as there is so much flexibility and options with them, but I also love to try out new things. I have played with resins, fimo, bead and many other things.


I also love saving and recycling, so like to try and use plastics, I have experimented with old plastic bags, plastic bottles and other colourful bits I've collected along the way.


flower pendant handmade jewellery
I have always loved beachcombing and finding pretty things by the sea. I always used to collect shells and unusual stones. I have recently made some items from pebbles and also shells. I have also discovered plastics on the beach as well and have used washed up cotton buds and plastics in my designs, which add a touch of colour and also help the enviroment.


handmade jewelleryhandmade jewellery

So thats my inspirations, next comes the ideas...


When I get an idea I start by sketching them and drawing them out with scribbled notes around them so I remember what it was that I wanted to do.


I draw my designs onto a pad made up of reused paper, like old ltters etc so that I don't hav to cut down a forest to design my items!


Below are a couple of examples.


sketchbook jewellery

notebook handmade jewellery
Once I've done this I take my sketchbook to my workbench and think about how I can make them a reality. This means a lot of experimenting (and mistakes) but it is all a learning curve and sometimes I make something I love and really want to wear. :).


workbench jewellery

This is the space I work in, with a workbench and all my tools, so I spend a bit of time here making.


Next its time to draw my items onto the materials or metals that I want to cut out.


With a metal pendant I would first draw them onto the metal, like this


designing jewellery
I then would drill these and cut them out, I use a piercing saw to do this and then would sand and file them to finish.

saw pierced jewellerysaw pierced jewellery
The item before being sanded and filed would look like this:


lizard pendant handmade jewellery


The finished item, once filed and sanded and put together would look more like this flower pendant below.


flower handmade pendant

Hopefully this gives you an idea of how a piece of my jewellery comes togother, from inspiration to final design.


18.1.09

Making a necklace

making jewellry
I've just made a new necklace and thought i'd say how its done.

For more jewellery visit:

http://surfjewels.webhosting-for-free.com

How its done:

I began by making a cord, this was done by plaiting thread.
made jewellery
Then I collected together the beads I wanted to use.

Next I had to make the metal charms I wanted to decorate my long necklace with.

To do this I had to design the items on paper
handmaking jewellery
Then I had to cut draw them onto the metal and cut them out with a saw.
designing jewellery
Then I filed and sanded them to give them a nice finish. I then threaded them with a bead.jewellery makingjewellery making
I then decided on the layout of my necklace before knotting and threading the beads.
make handmade jewellery
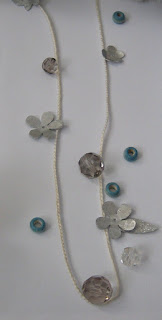
And this was the end product.

For more jewellery items visit: http://surfjewels.webhosting-for-free.com/

2.7.08

Making butterfly necklace

This post shows how I make my pieces of jewellery. I have shown the process of making a butterfly necklace which is a new item on my website
First of all I design my item on paper and write down the materials I will be using and sketch out the rough shape and design.I then drew out my final shapes on tracing paper in the size and shape I wanted them, I then traced these onto the aluminium I used for the charms.

I then cut out the shapes from the metal with a piercing saw and this is what I was left with.

I then got some wire and bent it into the shape to hang from the butterfly.
I then used a drill to put holes where I wanted them.I then threaded the wire through the bottom hole and bent to shape and then decided roughly where to put the flower charm.

I then decided on what beads I wanted to use I then threaded them onto some cotton thread


I attached the flower charm to the end of the seed beads and to the butterfly and then strung the pendant onto organic hemp cord that I plaited by hand.