Showing posts with label design. Show all posts

18.2.12

New Dress

I found a great new place to buy fabric and so picked up a nice piece to make a dress for work.


I recently made my own pattern that fits me perfectly, after reading a pattern making book, and so this was my first test run of using this.

This is the facing:

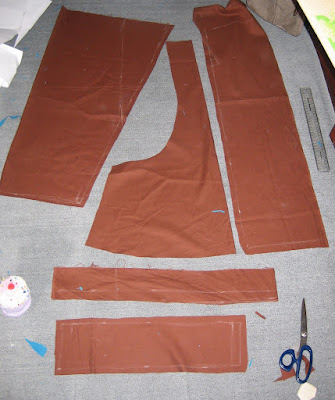
The pattern pieces cut out:

And the final dress:

29.7.11

Owl

Today I have been working on making an owl

I started off by doing some drawings of what I wanted to make and some ideas.


I then drew it out to actual size and cut it out for a template.

I then cut out the fabric pieces using the template.

This is all the pieces cut out and laid out where I want them.

Before stitching the back to the front, I sewed on all the detailed work, such as eyes, beak etc.

Then I did some sewing on my machine. This is the wing.

And I ended up with this:

owl, stitch, sew, thread

21.8.10

Just made a new dress

This is my third dress that I have made recently, a bit of a sewing frenzy!!
I designed this dress and made it myself. I started off my designing the pattern and then drew it all out on to the fabric, making sure it all fitted.
pattern
I then cut it all out. I hate the moment when you have to do the first cut, there's no going back!! At least if you sew something wrong you can unpick it, you definatly cannot uncut something (unfortunatly, there have been times when I wish you could).
cutting out pattern
Luckily the cutting went fine. I then started sewing and then pinned it all onto my manequin. I love my mannequin- great for pinning, when it would be a struggle to do it on yourself- you can never reach your back!handmade dress sewing

handmade dress making
This is my finished dress, pretty happy. Wanted something brown and fairly casual and I love big pockets!!
handmade dress making sewing pattern design dress brown

20.8.10

Turquoise Dress

handmade, dress, top, turquiose, sewn, sewing, pattern, design, fashion
I have just finished making this dress, it is not for myself, so I have made it in a bigger size.
I love the idea of big pockets, so designed this with some nice big pockets.

4.8.10

Making a Ring

I decided recently that I would make a ring. I have made one ring before, but it was a flower one very different to my new idea.
I decided to design a ring that I would cut out with a piercing saw. I played with lots of ideas and designs before settling on one.
note book - handmade, saw pierced, surf jewels, jewellery, ring, aluminium, flowers, leaves, hearts, design, making, designing
I did a test run also, which took me a lot of time and had a few problems- mainly some weak points that needed to be stronger (which I took into consideration the next time round).

Here is my final design that I drew out into my notebook.

jewellery ring design
I then drew this on to the aluminium sheet and began cutting it out with a piercing saw.
ring designThis image shows my piece held in a clamp which I use to hold it while cutting.
This is my ring once all cut out and roughly filed.
flower leaf heart ringI need to just do some finishing touches to this ring and then I will upload a pic soon. It currently needs a little more filing and finishing.

2.7.08

Making Flower Necklace

This post shows how I made a flower necklace.

I drew my design on to some recycled plastic and drilled two holes into it.

I then cut out another flower from aluminium and drilled two holes in this one.

I then placed the two flowers where I wanted them.

I then added a link to hold the two together

I cut out a flower charm and added this with seed beads and wire to my necklace.

Making butterfly necklace

This post shows how I make my pieces of jewellery. I have shown the process of making a butterfly necklace which is a new item on my website
First of all I design my item on paper and write down the materials I will be using and sketch out the rough shape and design.I then drew out my final shapes on tracing paper in the size and shape I wanted them, I then traced these onto the aluminium I used for the charms.

I then cut out the shapes from the metal with a piercing saw and this is what I was left with.

I then got some wire and bent it into the shape to hang from the butterfly.
I then used a drill to put holes where I wanted them.I then threaded the wire through the bottom hole and bent to shape and then decided roughly where to put the flower charm.

I then decided on what beads I wanted to use I then threaded them onto some cotton thread


I attached the flower charm to the end of the seed beads and to the butterfly and then strung the pendant onto organic hemp cord that I plaited by hand.